Build graphics in Design Studio
Create a layered graphic or animated title, then insert it into your project as one editable element.
When to use it
Use Design Studio for lower thirds, product cards, gradient text, and compositions that combine several layers. Use the regular Text tool for a simple heading.
How to create a design
Navigation: Editor → Design → New design.
- Open Design, then click New design.
- Start with the Text, Shape, or Image layer buttons, or open Templates and select a starting design.
- Click a layer to edit its properties. Drag it in the preview or enter its X and Y position.
- Click Canvas settings to set the design's Width, Height, Background, Font, and Loop options.
- Preview the composition in the center of the dialog.
- Click Insert element to add it to the project.
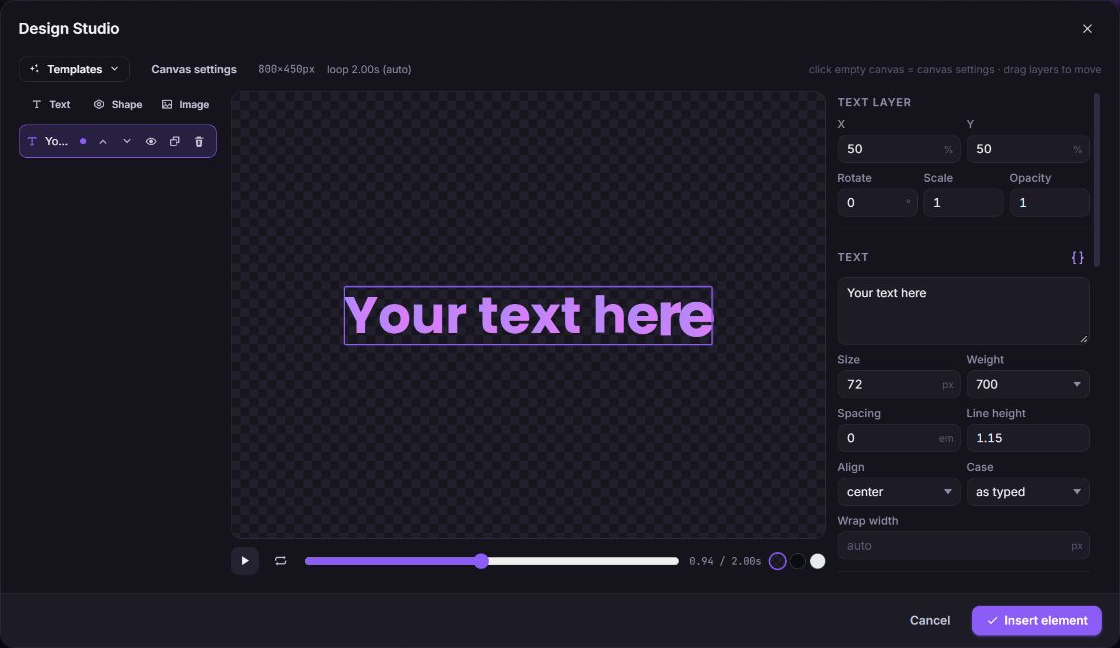
Selecting a template replaces the composition currently open inside Design Studio. Cancel closes the dialog without applying its current changes to the project.
How to edit layers
- Select a layer in the layer list.
- For text, edit the content, size, weight, spacing, line height, alignment, case, and wrap width. Use Fill, Outline, Shadow, and Highlight pill for styling.
- For shapes, choose the shape and adjust its dimensions and fill. Stroke width or Corner radius appears for shapes that support it.
- For images, enter a reachable URL, then set size, Radius, and Fit.
- Use Move up (toward front) or Move down (toward back) to reorder a layer.
- Use Hide, Show, Duplicate, or Delete layer as needed.
Deleting a layer removes it from the composition you are editing. Existing project content is updated when you click Update element.
How to animate a design layer
- Select the layer.
- In Animation, choose a preset.
- Adjust the controls shown for that preset: Duration or Period, Delay, Stagger, Easing, or From.
- Inspect the live preview.
- Click Insert element for a new design, or Update element for an existing one.
Text-specific presets can animate letters or words; Stagger is the delay between them. Design Studio uses one selected font family per design. Loop settings control the design's own animation; the element's timeline window controls when it is visible in the movie.
How to reopen and reuse a design
- Select an element created in Design Studio.
- Open Design → Design Studio → Edit design visually in its properties, or choose Edit in Design Studio from its element actions.
- Make your changes and click Update element.
- When signed in, open the tool rail's Design → Your designs to reuse a saved design.
- Click a saved design to insert another instance into the current project.
For a plain text element, Create an animated design opens the visual design workflow. Saved designs are reusable building blocks; they are distinct from account render templates.
How to delete a saved design
- Open Design → Your designs.
- Click Delete design on the item.
- Confirm the deletion.
This removes the design from your saved library. Existing project elements that already use it remain intact. There is no restore action in the saved-design panel.
What happens next
The inserted graphic behaves like one project element, with its own position and timing. Its layer data remains available for reopening in Design Studio. Save the project and render to inspect the final result.