Add and manage media
Use the Images, Videos, Audio, and GIFs tools to add assets from a URL, your uploads, or Zvid's stock library.
When to use it
Use uploaded assets for your own product photography, footage, and music. Use a reachable URL for existing hosted media, or search Zvid's stock library for additional content.
Before you begin
Account uploads require signing in. Source URLs must remain reachable by the render service when a render runs. A file that opens on your computer is not necessarily accessible to cloud rendering; see Media assets.
How to add media by URL
Navigation: Editor → Images / Videos / Audio / GIFs.
- Select the appropriate media tool.
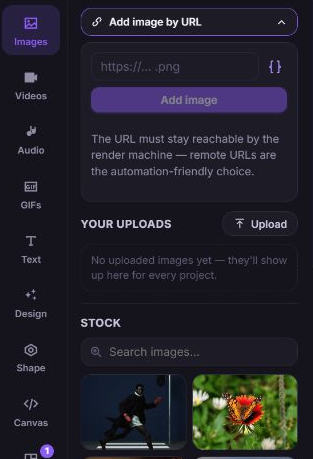
- Expand Add image by URL, Add video by URL, Add audio by URL, or Add GIF by URL.
- Paste the source URL. If you are authoring a template, use the variable insertion control to choose a defined placeholder.
- Click Add image, Add video, Add audio, or Add GIF.
- Select the inserted item to adjust its properties and timing.
Media is added to the current scene or global timeline. Check the selected scene and playhead before adding several assets.
How to upload a file
- Open the relevant media tool and find Your uploads.
- Click Upload, then choose a matching file, or drop it into the uploads area.
- Wait for the upload progress to finish.
- Click the uploaded item to insert it. Visual assets can also be dragged onto the canvas.
- Use Play preview for an audio asset before adding it.
Uploads belong to your account library and can be reused in other projects. Upload acceptance and render acceptance are separate: duration, resolution, file size, and plan limits may still prevent a render. See media asset requirements for the current rules.
How to search the stock library
- Open a media tool and find Stock. In Audio, select Music first.
- Enter a search term. Press Enter to run the search immediately.
- Scroll to load additional results, or use Load more when shown.
- Hover a video or GIF result to preview it; use Play preview for audio.
- Click a result to add it at the playhead, or drag a visual result onto the canvas or timeline.
For short audio cues, open Audio → Sound effects. Search the list, preview a sound, then click its add control.
How to delete an uploaded asset
- In Your uploads, find the file.
- Click Delete upload.
- Read the confirmation and confirm only when you no longer need the hosted file.
Deletion removes the hosted asset, not just an element in the current project. Other projects or templates referencing its URL can stop loading it once the file is gone. There is no restore action in this panel. To remove one use from your composition, select the element and choose Delete instead.
Troubleshooting
Uploads or stock results do not load
Cause: The request failed, or uploads need an account session.
Solution: Sign in if prompted. Use Retry in the affected section and check the message beside it. For a URL source, confirm that the URL returns the media itself without requiring a private browser session.
What happens next
Each visual asset becomes an editable element; audio becomes a timeline track. Continue with the controls for your asset: