Manage scenes and scene transitions
Divide a video into scenes, each with its own content, background, and local timeline.
When to use it
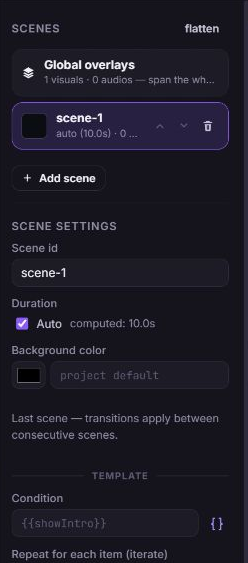
Use scenes for slideshows, story sequences, and reusable sections such as an intro, product section, and outro. Content inside a scene uses time measured from that scene's start. Global overlays holds elements that use the whole-movie timeline, such as a persistent logo or music track.
Before you begin
Open a Video project. Save a copy before changing an established project from a flat timeline to scenes or back.
How to add and edit scenes
Navigation: Editor → Scenes.
- Click Add scene.
- Select the scene card to edit its local timeline.
- In Scene settings, enter Scene id and set Background color if it should differ from the project background.
- Leave Duration → Auto enabled to follow scene content. To use a fixed duration, turn Auto off and enter a value beside Set length.
- Add media, text, and audio while that scene is selected.
- Add more scenes and repeat.
The active scene's duration and the complete project duration are shown separately. If fixed-length scene content extends beyond its boundary, choose Extend scene to fit above the timeline.
How to reorder or delete a scene
- In Scenes, find the scene card.
- Use Move up or Move down to change its order.
- To remove it, click Delete scene.
Delete scene immediately removes the scene and its local visual and audio elements from the working project. Use Undo during the editing session to recover an unintended deletion. Global overlays are separate from the deleted scene. Review transitions after reordering or deletion.
How to add a scene transition
- Create at least two scenes.
- Select the earlier scene.
- Under Scene settings → Transition to next scene, choose an effect.
- Set Transition duration to the overlap between the two scenes. Keep it shorter than either adjacent scene.
- Select Global overlays, then full movie above the timeline and play across the join.
Choose None (hard cut) to remove the transition. The final scene has no outgoing scene transition. Reordering updates transitions to point to the next scene.
Overlap reduces the final movie length: two five-second scenes with a one-second transition produce a nine-second sequence. Some effects use approximate browser previews; inspect a render for the final result.
How to add content across the movie
- Open Scenes → Global overlays.
- Select overlays above the timeline if you are in full movie preview.
- Add your logo, title, or audio track.
- Set its timing against the entire project rather than a single scene.
How to convert between a timeline and scenes
- For a project without scenes but with visual or audio content, open Scenes and click convert timeline → scene. Existing visual and audio elements move into the first scene.
- To move scene content into one root timeline, open Scenes and click flatten.
- Review timing, layering, backgrounds, and playback after conversion.
Flatten moves local visual and audio elements to the main timeline and removes the scene containers. Scene-level backgrounds, transitions, conditions, and repeat settings are not preserved as scene behavior. Save a separate draft before flattening a composition that depends on these settings.
What happens next
The full-movie preview shows the sequence and transitions. For scenes that repeat for each product or depend on a flag, use variables, iteration, and conditions.