Create and monitor bulk renders
Bulk renders creates multiple video or image outputs from one saved template, using one row of variable values per output.
When to use it
Use a batch for product catalogs, personalized messages, campaign variations, or other work that repeats a design with different data. To try one set of values first, use the template's free preview.
Before you begin
- Have an active saved template in your account.
- Prepare values for its variables, either manually or in a CSV file.
- Have enough credits for the accepted outputs. Rendering reserves credits when you submit the batch.
The number of rows allowed in one submission depends on your plan and cannot exceed 500. If a submission exceeds the applicable limit, divide the data into smaller batches.
Choose a template and batch settings
Navigation: Dashboard → Bulk renders → New bulk render
-
Select Bulk renders in the sidebar.
-
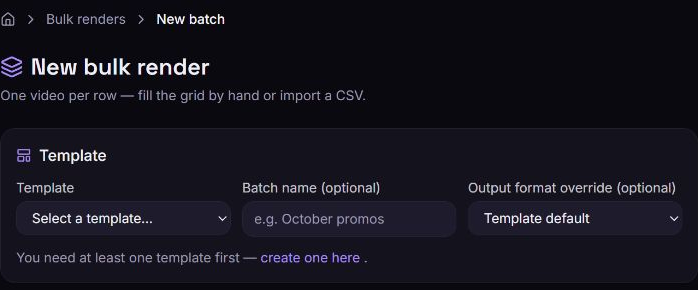
Select New bulk render. On an empty list, Create your first batch opens the same form.
-
Choose the saved design from Template. The options show each template's name and version.
-
Optionally enter Batch name (optional) to recognize this group later.
-
Leave Output format override (optional) set to Template default, or choose a named resolution preset for the batch.
Selecting a template loads one data row populated with its variable defaults. The form uses the template type to produce videos or images, although several controls currently use the word “video” for both.
Selecting another template clears the data grid and loads that template's defaults. Finish or preserve your data before switching templates.
Enter data manually
- In Data, optionally enter an output name for the first row.
- Replace the variable values in that row. Each column shows the variable name and type.
- Select Add row to create another row with the saved defaults, or Duplicate row to copy an existing row immediately below it.
- Use Remove row to remove an unwanted row before submission.
Removing a row changes the current form; it does not cancel an already submitted render. The form has no undo control for removed rows.
| Variable type | Entry rule |
|---|---|
| String | Enter the required text, color, or media URL. |
| Number | Enter a number; a blank value retains the saved default. |
| Boolean | Select or clear the checkbox. |
| Array or object | Enter valid JSON in the cell. It is parsed before submission. |
A template without variables creates the same content for each row; you can still give the outputs different names.
Import a CSV file
Navigation: Dashboard → Bulk renders → New bulk render → Select a template → Import CSV
- Select Download CSV template to download a file with the correct column headers and a sample row.
- In your spreadsheet editor, replace the sample with your data. Keep one row per output.
- Save the file as CSV.
- Select Import CSV and choose the file.
- Check the imported row count and values before rendering.
Importing a CSV replaces all rows currently in the form. It does not append to them. Keep a copy of any manually entered values you still need.
The first CSV row must contain headers, followed by at least one data row. Match template variable names exactly. The optional name column names the output; columns not recognized as variables are ignored and listed in the import notification. If a variable column is omitted, its saved default is used.
CSV conversion follows these rules:
- Numeric values become numbers. Blank numeric cells keep the saved default.
- Boolean values
true,1,yes, andymean true, ignoring case and surrounding spaces. Other values mean false; usefalsefor clarity. - Arrays and objects must contain valid JSON. CSV fields containing commas or quotes need standard CSV quoting; generating the file with a spreadsheet editor is usually simplest.
- An empty string cell replaces a string default with empty text. Omitting the column preserves the default.
Submit the batch
- Review the template, optional resolution, and number of rows in Data.
- Confirm that each row contains the intended values and that your account has sufficient credits.
- Select Render N videos, where N is the row count. For one row, the label is Render 1 video.
- Read the submission result before attempting to submit again.
When all rows are accepted, a confirmation reports the number of queued renders and reserved credits. The dashboard opens the new batch's detail page. Rendering proceeds in the background; returning to another dashboard page does not cancel it.
For video batches, credits are reserved for individual jobs. For image batches, credits are reserved for the batch and reconciled after its jobs finish. Check Credits for spending and refunds rather than adding together the item estimates shown on an image batch.
Correct rejected rows without duplicating accepted work
Some rows can pass validation while others fail. In that case, accepted rows are already queued and the form stays open.
- Read the message stating how many outputs were queued. The batch ID link opens those accepted jobs.
- Review the Row N error messages.
- Correct the remaining rows in the grid. The form has removed accepted rows and kept only rejected rows.
- Select Render N videos again to submit the corrected rows as another batch.
Do not reimport the original complete CSV just to retry validation failures: doing so reintroduces accepted rows and can create duplicate paid outputs. If all rows are rejected, correct the displayed errors before submitting again.
Monitor a batch
Navigation: Dashboard → Bulk renders → Batch name
- Select the batch from Bulk renders.
- Review Videos or Images, Completed, Failed, Pending, and Credits at the top.
- Inspect each row for its status, dimensions, duration for video, and credit amount.
- Select Refresh to retrieve the latest result immediately.
The batch list refreshes processing batches about every five seconds; the detail page refreshes about every four seconds. The dashboard shows the latest 50 batches in the list. Keep a batch's direct link or blk_… ID if you need to return to it later.
| Batch status | Meaning |
|---|---|
| Processing | At least one job is still pending or rendering. |
| Completed | All outputs completed successfully. |
| Completed with errors | Some outputs succeeded and others failed. |
| Failed | The batch's outputs failed. |
The progress bar measures finished jobs, including both completed and failed jobs. A batch can reach 100% with errors. The Credits summary is the amount reserved for the batch; use the credit transactions to inspect subsequent refunds.
Open or download completed outputs
- Open the batch detail page.
- On a row with an output URL, select Open video to open the media in a new tab.
- Select Download video to request a download. These icon titles also appear for image outputs.
Depending on your browser and how it handles media links, the download action may open the output instead. You can also find completed jobs in Renders and use the Download button there.
For programmatic result collection, use the bulk rendering API. The dashboard detail page currently provides individual output links, not a CSV export action.
Inspect failed outputs
- Open Bulk renders and select the affected batch.
- Find rows marked failed and read the error beside their dimensions and credit amount.
- Correct the source template or affected variable values.
- Create another bulk render containing only the outputs you need to retry.
The detail page has no retry-all or cancel-batch control. A new submission is a separate batch and can spend credits for any outputs that succeed. Keep the failed batch for reference while correcting the next submission.
Troubleshooting
No templates are available
Cause: A batch requires a saved active template in the signed-in account.
Solution: Follow create one here in the form, or open Templates → New template. Return to New bulk render after creating it. The selector loads up to 50 active templates.
CSV needs a header row plus at least one data row
Cause: The imported file did not contain both a header and usable data.
Solution: Start with Download CSV template, retain its header, and add at least one row of values before importing again.
An imported column was ignored
Cause: Its header does not exactly match a template variable or the optional name field.
Solution: Compare the header with the downloaded CSV template, correct it, and import the file again. Importing again replaces the current grid.
Row N contains invalid JSON
Cause: An array or object cell cannot be parsed.
Solution: Correct that cell using valid JSON, including double-quoted object keys and strings, then resubmit. A JSON parsing error in the form must be fixed before it can submit the batch.
Insufficient credits or too many items
Cause: The accepted outputs need more credits than are available, or the submitted row count exceeds the plan limit.
Solution: Review Credits and billing. Add credits or reduce the batch, and split over-limit data into smaller batches. Read any queued-batch confirmation before resubmitting so that accepted work is not repeated.
Bulk render not found
Cause: The batch link may be incorrect or inaccessible to the signed-in account.
Solution: Open Bulk renders in the account that submitted the batch and select it from the list. If the list also fails to load, reload the page before concluding the batch is missing.