Configure MCP and download an n8n agent
The AI agent tools settings choose which Zvid tools an AI client can use and the maximum credits it can spend on one render.
When to use it
Use these settings before connecting an AI client through Model Context Protocol (MCP) or downloading the dashboard's n8n AI-agent workflow. For direct REST applications, start with API keys.
Choose your tool profile and credit ceiling
Location: Dashboard → Settings → AI agent tools.
-
Open Settings from the sidebar.
-
Scroll to AI agent tools.
-
Select a profile:
Profile Intended access Creator — Recommended Authoring with planning, examples, creative libraries, Zvid's stock library, validation, projects, and templates. Drafts require exact project JSON; rendering follows an approval flow. Read Only Inspect existing media, account credits, and usage without creating or rendering. Automation Trusted workflows that need direct renders, capped bulk rendering, and webhook operations. Developer All enabled MCP tools for trusted development, including direct rendering and automation. Update/delete tools remain disabled. -
Set Maximum credits per render to a whole number from 1 to 10,000. The default is 30.
-
Click Save MCP Defaults and wait for MCP defaults updated.
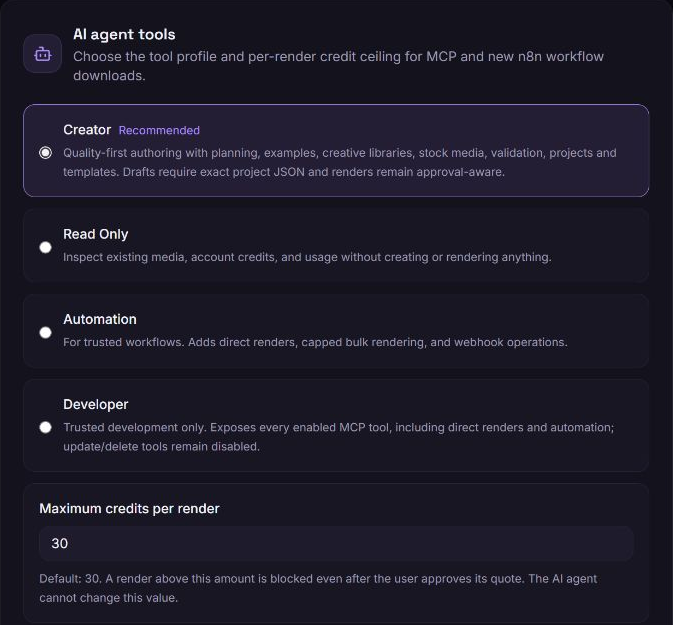
A render above this amount is blocked even if the user approved its quote. The AI agent cannot change this value. This is a per-render ceiling, not a daily or monthly spending budget.
Download the n8n AI-agent workflow
- Save any changed MCP settings first.
- Click Download n8n Workflow in AI agent tools.
- Import the downloaded
zvid-ai-agent-<profile>.jsonfile into n8n using its workflow import action. - Read the imported workflow's Setup note.
- Open OpenRouter Chat Model and select an OpenRouter API credential.
- Open Zvid MCP Tools, create or select an MCP OAuth2 API credential, keep dynamic client registration enabled, and sign in to Zvid.
- Review the Zvid consent screen and complete authorization.
- Open the Chat Trigger's test chat to try the agent. Read and approve any render quote before proceeding with a credit-spending request.
The workflow connects through the built-in MCP Client Tool. Its endpoint includes the profile and credit ceiling selected at download time. Tools to Include can further narrow the tools exposed by that profile.
Changing dashboard defaults later does not update an already imported workflow. Download a new copy or deliberately update that workflow's endpoint settings. Dashboard defaults apply to future downloads and MCP clients that do not explicitly select their own profile or ceiling.
The downloaded agent uses n8n's built-in nodes. If you instead use a workflow with Zvid action or trigger nodes, a workspace owner/admin may need to install @zvid/n8n-nodes-zvid from Settings → Community nodes before configuring Zvid credentials. See Integrations for the separate community-node setup.
Authorize an MCP client
Location: Start the connection in your MCP client → Zvid sign-in → Connect to Zvid.
- Configure your client to connect to
https://mcp.zvid.io/mcp, following its MCP connection instructions. - Start sign-in from the client and sign in to your Zvid account when prompted.
- On Connect to Zvid, check the Application name and website, when shown.
- Read the listed access, including whether the selected profile allows rendering and use of credits.
- Click Allow access to authorize, or Deny to reject the request.
You return to the requesting client. With OAuth, no API key is shared; the client receives an access token and may refresh it. The customer dashboard currently has no connected-app management list. Use the client's disconnect/revoke controls when available; removing local settings alone should not be treated as confirmed server-side revocation.
Troubleshooting
Download n8n Workflow is disabled
Cause: Your changes have not been saved, a download is already starting, or MCP preferences failed to load.
Solution: Click Save MCP Defaults first. If the page shows a preferences-loading error, reload Settings before downloading.
Maximum render credits is rejected
Enter a whole number between 1 and 10,000, then save again.
The consent screen says “Request unavailable”
The request is invalid or expired. Return to the MCP client and start sign-in again; do not reuse the old consent URL.
A tool or render is unavailable
Check the saved profile, explicit settings in your MCP client's endpoint, and Tools to Include in n8n. If a render exceeds the ceiling, reduce its estimated cost or have the workflow owner deliberately change the ceiling. Profile defaults do not rewrite existing workflows.